使用XML就应该简单点
解析起来不仅耗内存,而且很复杂。
这就好像花了几千块钱买了个MS Office,但
【菜科解读】
对于现在越来越轻量级,越来越讲究速度和接近用户的应用来说,xml确实有点复杂了。
解析起来不仅耗内存,而且很复杂。
这就好像花了几千块钱买了个MS Office,但是80%的feature都用不着,还白白的耗着CPU和内存。

个人觉得,设置文件用XML其实挺好,因为设置文件一般并不太大,而且要求可读性强,还有很多乱七八糟的需求,可以利用XML的力量。
昨天搞chrome的设置,发现chrome的设置文件也是使用的json,读起来也是轻松愉快。
前阵子做了个程序,需要解析豆瓣API调用返回的XML。
真想说一句。
。
。
豆瓣你别用XML了。
。
。
至少,提供个json版的API调用吧。
(以上谨代表个人观点)
===================正文=================
解析豆瓣返回的xml,实在是不想用DOM这个重量级的玩意。
DOM这个玩意,说它强大好还是说它官僚好呢。
我倾向于使用SAXP解析。
但是现在面临的一个问题是,我需要根据xml节点的名字和属性值(一个或者多个)来决定当前的值是不是我想要的。
这就麻烦一点点。
第一反应是考虑xpath。
后来觉得不如自己做一个得了,权当是按需定制一个轻量级的xpath。

首先定义XMLSearchUnit类,这个类的实例用来描述一个需要在XML中搜索的值,值可以是xml节点的值,或者是节点的属性。
package com.deepnighttwo.resourceresolver.douban.resolver.utils;import java.util.HashMap;import java.util.Map;import org.xml.sax.Attributes;/*** * Represent a search task. Target could be value of a node or attribute of the* node.* * @author mzang*/publicclass XMLSearchUnit {// attribute values to be matched during searchprivate MapString, String> attributeMatchValidation =new HashMapString, String>();// if target is an attribute, then set this member to be the attribute name.// if it is null or empty, then means the target is node value.private String expectedAttr;// xml path, format is: /node_name/node_name/...private String xmlPath;public XMLSearchUnit(String xmlPath) {this.xmlPath = xmlPath;}/*** if current node meets the search conditions or not. Meets means the path* is correct and the attribute value is matched.* * @param path* @param attributes* @return*/publicboolean match(String path, Attributes attributes) {if (xmlPath.equals(path) ==false) {returnfalse;}for (String key : attributeMatchValidation.keySet()) {String exp = attributeMatchValidation.get(key);String compare = attributes.getValue(key);if (exp.equalsIgnoreCase(compare) ==false) {returnfalse;}}returntrue;}public MapString, String> getAttributeMatchValidation() {return attributeMatchValidation;}publicvoid addAttributeValidation(String key, String value) {attributeMatchValidation.put(key, value);}public String getXmlPath() {return xmlPath;}publicvoid setAttributeMatchValidation(MapString, String> attributeMatchValidation) {this.attributeMatchValidation = attributeMatchValidation;}public String getExpectedAttr() {return expectedAttr;}/*** if target is node value, then set expectedAttr to null. if target is an* attribute value, set it to be the attribute name.* * @param expectedAttr*/publicvoid setExpectedAttr(String expectedAttr) {this.expectedAttr = expectedAttr;}/*** hash code can be cached if all properties are not be be changed.*/@Overridepublicint hashCode() {finalint prime =31;int result =1;result = prime* result+ ((attributeMatchValidation ==null) ?0: attributeMatchValidation.hashCode());result = prime * result+ ((expectedAttr ==null) ?0 : expectedAttr.hashCode());result = prime * result + ((xmlPath ==null) ?0 : xmlPath.hashCode());return result;}@Overridepublicboolean equals(Object obj) {if (this== obj)returntrue;if (obj ==null)returnfalse;if (getClass() != obj.getClass())returnfalse;XMLSearchUnit other = (XMLSearchUnit) obj;if (attributeMatchValidation ==null) {if (other.attributeMatchValidation !=null)returnfalse;} elseif (!attributeMatchValidation.equals(other.attributeMatchValidation))returnfalse;if (expectedAttr ==null) {if (other.expectedAttr !=null)returnfalse;} elseif (!expectedAttr.equals(other.expectedAttr))returnfalse;if (xmlPath ==null) {if (other.xmlPath !=null)returnfalse;} elseif (!xmlPath.equals(other.xmlPath))returnfalse;returntrue;}}
这个类比较简单。
就是用一个hashmap保待匹配的attribut键值对,用一个字符串表示期待的attribute name,用一个字符串表示期待的node path。
然后就是如何在SAXP里用到这个类的实例去搜索了。
package com.deepnighttwo.resourceresolver.douban.resolver.utils;import java.io.InputStream;import java.util.ArrayList;import java.util.HashMap;import java.util.List;import java.util.Map;import javax.xml.parsers.SAXParser;import javax.xml.parsers.SAXParserFactory;import org.xml.sax.Attributes;import org.xml.sax.InputSource;import org.xml.sax.SAXException;import org.xml.sax.XMLReader;import org.xml.sax.helpers.DefaultHandler;/*** * SAXP parser working with XMLSearchUnit.* * @author mzang*/publicclass DoubanSearchParser extends DefaultHandler {// create and initial search unitspublicstaticfinal XMLSearchUnit DETAILS_LINK_API_PATH =new XMLSearchUnit("/feed/entry/id");publicstaticfinal XMLSearchUnit DETAILS_CONTENT_PATH =new XMLSearchUnit("/entry/summary");publicstaticfinal XMLSearchUnit DETAILS_TITLE_PATH =new XMLSearchUnit("/entry/title");publicstaticfinal XMLSearchUnit DETAILS_CHINESE_NAME_PATH =new XMLSearchUnit("/entry/db:attribute");publicstaticfinal XMLSearchUnit DETAILS_RATINGE_PATH =new XMLSearchUnit("/entry/gd:rating");publicstaticfinal XMLSearchUnit DETAILS_RATINGE_RATER_COUNT_PATH =new XMLSearchUnit("/entry/gd:rating");publicstaticfinal XMLSearchUnit DETAILS_LINK_URL_PATH =new XMLSearchUnit("/feed/entry/link");static {DETAILS_LINK_URL_PATH.addAttributeValidation("rel", "alternate");DETAILS_LINK_URL_PATH.setExpectedAttr("href");DETAILS_CHINESE_NAME_PATH.addAttributeValidation("lang", "zh_CN");DETAILS_CHINESE_NAME_PATH.addAttributeValidation("name", "aka");DETAILS_RATINGE_PATH.setExpectedAttr("average");DETAILS_RATINGE_RATER_COUNT_PATH.setExpectedAttr("numRaters");}// a map to store the XMLSearchUnit and valueprivate MapXMLSearchUnit, String> results =new HashMapXMLSearchUnit, String>();// a counter of search unit. if it is 0, then all search unit finds a match// value and the result of the XML will be skipped.privateint count =0;private StringBuilder path =new StringBuilder();privatestaticfinal String pathSeparater ="/";private XMLSearchUnit[] searchUnits;ListXMLSearchUnit> foundItems =new ArrayListXMLSearchUnit>();/*** constructor, accept XML input stream, 0 or more search unit instances.* * @param input* @param expectedPath* @return*/public MapXMLSearchUnit, String> parseResults(InputStream input,XMLSearchUnit... expectedPath) {for (XMLSearchUnit search : expectedPath) {results.put(search, null);}searchUnits = expectedPath;count = expectedPath.length;XMLReader xmlReader =null;try {SAXParserFactory spfactory = SAXParserFactory.newInstance();spfactory.setValidating(false);SAXParser saxParser = spfactory.newSAXParser();xmlReader = saxParser.getXMLReader();xmlReader.setContentHandler(this);xmlReader.parse(new InputSource(input));} catch (Exception e) {System.err.println(e);System.exit(1);}return results;}privatevoid addToPath(String addPath) {path.append(pathSeparater).append(addPath.toLowerCase());}privatevoid popPath() {int index = path.lastIndexOf(pathSeparater);// String removedPath = path.substring(index);path.delete(index, path.length());}@Overridepublicvoid startElement(String uri, String localName, String qName,Attributes attributes) throws SAXException {foundItems.clear();if (count ==0) {return;}// update pathaddToPath(qName);ListXMLSearchUnit> foundAttrItems =null;// check if current node matches search units. if it is a node value// search, then store it in a member variable named foundItems because// the value of the node is known only when reaches the end of the// node.but for attribute search, it value is known here. So then are// put in a local variable list named foundAttrItems.for (XMLSearchUnit unit : searchUnits) {if (unit.match(path.toString(), attributes) ==true) {if (unit.getExpectedAttr() ==null) {foundItems.add(unit);} else {if (foundAttrItems ==null) {foundAttrItems =new ArrayListXMLSearchUnit>();}foundAttrItems.add(unit);}}}// if no attribute match, return.if (foundAttrItems ==null) {return;}// fill search unit value using attribute value. update count.for (XMLSearchUnit attrUnit : foundAttrItems) {String attrValue = attributes.getValue(attrUnit.getExpectedAttr());if (results.get(attrUnit) ==null) {count--;}results.put(attrUnit, attrValue);count--;}}/*** if current node matches, the the node value is useful, store it.*/@Overridepublicvoid characters(char[] ch, int start, int length)throws SAXException {if (count ==0) {return;}if (foundItems.size() ==0) {return;}for (XMLSearchUnit unit : foundItems) {String content =new String(ch, start, length);if (results.get(unit) ==null) {count--;}results.put(unit, content);}}@Overridepublicvoid endElement(String uri, String localName, String qName)throws SAXException {foundItems.clear();if (count ==0) {return;}popPath();}} 使用,XML,就,应该,简,单点,对于,现在,越来越,如何使用U盘重新安装Windows 7系统
软件支持 在线重装、U盘制作、自定义重装 等多种模式。
如何使用U盘重新安装Windows 7系统简介:在电脑使用过程中,由于各种原因可能导致系统崩溃或出现其他问题,此时重新安装系统是一个解决办法。
然而,重新安装系统需要安装盘或U盘等工具,本文将详细介绍如何使用U盘重新安装Windows 7系统,帮助解决系统问题并提高电脑性能。
工具原料:电脑品牌型号:XYZ电脑公司的ABC型号操作系统版本:Windows 7软件版本:Windows 7安装文件一、准备U盘安装文件1、下载合适的Windows 7安装文件,并确保文件完整性和版本匹配性。
2、准备一个容量较大的U盘,并将其插入电脑。
二、制作启动U盘1、打开U盘所在的文件夹,在其中创建一个新的文件夹,命名为"Windows 7启动盘"。
2、将下载好的Windows 7安装文件解压到新创建的文件夹中。
3、打开命令提示符,输入命令"diskpart"进入磁盘分区工具。
4、在磁盘分区工具中,依次输入"list disk"、"select disk X"(X为U盘在电脑中的编号)和"clean"命令,清空U盘的分区。
5、输入"create partition primary"命令,创建U盘的主分区。
6、输入"format fs=ntfs quick"命令,快速格式化U盘为NTFS文件系统。
7、输入"active"命令,激活U盘分区。
8、输入"assign"命令,分配U盘一个驱动器号。
9、输入"exit"命令退出磁盘分区工具。
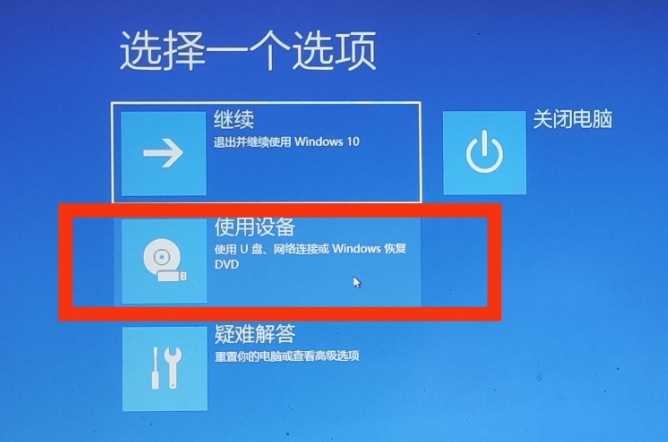
三、使用U盘重新安装Windows 7系统1、重启电脑,并按下启动键进入BIOS设置。
2、在BIOS设置中,将U盘设为第一启动项。
3、保存设置并退出BIOS,电脑将会从U盘启动。
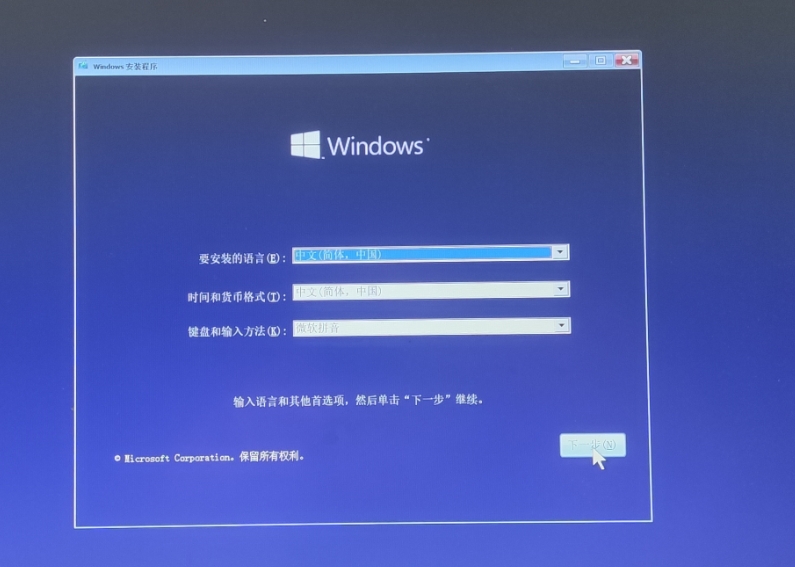
4、根据屏幕提示,选择语言、时区和键盘布局等设置。
5、选择"安装"选项并同意许可协议。
6、选择U盘所在位置和系统版本。
7、选择"自定义"安装类型,并根据需要选择所需分区。
8、开始安装Windows 7系统。
9、完成安装后,根据引导指引进行首次系统设置。
总结:重新安装Windows 7系统是解决电脑问题的有效方法,通过使用U盘重新安装系统,可以解决系统崩溃和提升电脑性能的问题。
准备一个合适的U盘安装文件,制作启动U盘并正确按照步骤重新安装系统,可以让您的电脑重新焕发活力。
在进行重新安装之前,务必备份重要数据,以免数据丢失。
同时,定期进行系统维护和更新也是保持电脑性能的重要措施。
标签: 注意:本站所刊载的文章均为学习交流之用,请勿用于商业用途。
对于商业使用,请联系各自版权所有者,否则法律问题自行承担。
Win7系统升级指南:全面解析升级步骤与要点 Win7系统损坏修复教程:详细步骤助你快速解决问题 如何使用U盘重新安装Windows 7系统简介:在电脑使用过程中,由于各种原因可能导致系统崩溃或出现其他问题,此时重新安装系统是一个解决办法。
然而,重新安装系统需要安装盘或U盘等工具,本文将详细介绍如何使用U盘重新安装Windows 7系统,帮助解决系统问题并提高电脑性能。
工具原料:电脑品牌型号:XYZ电脑公司的ABC型号操作系统版本:Windows 7软件版本:Windows 7安装文件一、准备U盘安装文件1、下载合适的Windows 7安装文件,并确保文件完整性和版本匹配性。
2、准备一个容量较大的U盘,并将其插入电脑。
二、制作启动U盘1、打开U盘所在的文件夹,在其中创建一个新的文件夹,命名为"Windows 7启动盘"。
2、将下载好的Windows 7安装文件解压到新创建的文件夹中。
3、打开命令提示符,输入命令"diskpart"进入磁盘分区工具。
4、在磁盘分区工具中,依次输入"list disk"、"select disk X"(X为U盘在电脑中的编号)和"clean"命令,清空U盘的分区。
5、输入"create partition primary"命令,创建U盘的主分区。
6、输入"format fs=ntfs quick"命令,快速格式化U盘为NTFS文件系统。
7、输入"active"命令,激活U盘分区。
8、输入"assign"命令,分配U盘一个驱动器号。
9、输入"exit"命令退出磁盘分区工具。
三、使用U盘重新安装Windows 7系统1、重启电脑,并按下启动键进入BIOS设置。
2、在BIOS设置中,将U盘设为第一启动项。
3、保存设置并退出BIOS,电脑将会从U盘启动。
4、根据屏幕提示,选择语言、时区和键盘布局等设置。
5、选择"安装"选项并同意许可协议。
6、选择U盘所在位置和系统版本。
7、选择"自定义"安装类型,并根据需要选择所需分区。
8、开始安装Windows 7系统。
9、完成安装后,根据引导指引进行首次系统设置。
总结:重新安装Windows 7系统是解决电脑问题的有效方法,通过使用U盘重新安装系统,可以解决系统崩溃和提升电脑性能的问题。
准备一个合适的U盘安装文件,制作启动U盘并正确按照步骤重新安装系统,可以让您的电脑重新焕发活力。
在进行重新安装之前,务必备份重要数据,以免数据丢失。
同时,定期进行系统维护和更新也是保持电脑性能的重要措施。
菜科网系统致力于解决 Windows 系统重装解决方案,提供高效、安全、免费的系统重装服务。
[word表格]的使用指南
作为办公软件中的重要工具之一,word表格在日常工作中扮演着重要的角色。
通过合理利用表格,我们可以更高效地整理数据、制作报表、进行数据分析等。
下面,我将通过一些案例来说明表格的重要性,并简要概括本文内容,阐述我对表格使用的观点。
工具原料:在本文中,我将以Windows操作系统为例,使用Microsoft Office套件中的Word软件进行演示。
具体的工具原料如下:操作系统版本:Windows 10品牌型号:HP EliteBook 840 G5软件版本:Microsoft Office 365正文:一、表格的基本操作1、创建表格:在Word中,我们可以通过点击“插入”选项卡中的“表格”按钮来创建表格。
选择所需的行数和列数,即可创建一个空白的表格。
2、调整表格大小:如果我们需要调整表格的大小,可以通过鼠标拖动表格边缘来改变表格的尺寸。
3、插入和删除行列:在表格中,我们可以通过右键点击表格中的行或列,选择“插入”或“删除”来增加或减少行列。
二、表格样式和格式1、应用表格样式:Word提供了多种表格样式供我们选择,可以通过点击“设计”选项卡中的“表格样式”来应用不同的样式。
2、设置边框和背景色:我们可以通过点击“布局”选项卡中的“边框”和“填充”按钮来设置表格的边框样式和背景色。
3、合并和拆分单元格:如果我们需要合并表格中的单元格,可以通过选中需要合并的单元格,然后点击“布局”选项卡中的“合并单元格”按钮来实现。
三、表格数据处理1、排序和筛选:在表格中,我们可以通过点击表格标题栏上的箭头按钮来对表格数据进行排序。
同时,我们还可以使用“筛选”功能来筛选出符合条件的数据。
2、公式计算:Word表格中也可以进行简单的公式计算,比如求和、平均值等。
我们只需要在需要计算的单元格中输入相应的公式即可。
3、数据图表:如果我们需要将表格数据可视化,可以通过点击“插入”选项卡中的“图表”按钮来创建数据图表。
总结:通过本文的介绍,我们了解了[word表格]的基本操作、样式和格式设置,以及数据处理的方法。
合理利用表格可以提高工作效率,使数据更加直观清晰。
希望本文对大家在使用表格时有所帮助,并能够发挥表格的优势,提升工作效率。